How to properly assemble a complete functional measurement with conversion targets and UTM parameters
In many industries, competition continues to grow and digital marketing is no longer a supplement, but the main (and often only) battlefield in the fight for customers. Getting measurement right is now a prerequisite for a successful digital strategy, but not sufficient. That's why at TRITON IT we focus on how to create and effectively manage complete measurement, concentrating on key aspects such as setting conversion targets and using UTM parameters.
Setting targets
Before you start measuring, you need to set clear goals. Defining conversion goals is necessary to measure the success of your campaigns. Conversion goals should be well defined and match your organization's strategy. The so-called hard goal (the most tangible outcome you are able to measure) should be preceded by a sequence of soft goals (milestones) such that you are able to determine the weakest point at which you lose the greatest number of future customers.
| goal | definition | example |
|---|---|---|
| soft | Steps leading to the achievement of a hard goal | Add to cart |
| hard | The specific end goal that the campaign is intended to achieve | Purchase |
Below is an example of a goal sequence for measuring different web platforms.
| platform | soft goal 1 | soft goal 2 | soft target 3 | soft target 4 | soft target 5 | hard target |
|---|---|---|---|---|---|---|
| e-shop | interaction with product detail | adding the product to the cart | selecting the delivery method | choice of payment method | start payment | completing payment |
| online service | interaction with the demo version | start registration | completing registration | tariff selection | start payment | complete payment |
| offline service | view service information | download materials | view forms | start filling in the form | submitting the form | receiving a valid lead |
Analysis of e-commerce milestones
Interaction with product detail: indicates user interest in the product
Add to cart: indicates the user's initial intention to purchase the product
Choice of delivery method: indicates the user's intention to continue purchasing the product
Choice of payment method: indicates intent to complete the purchase Frequent check-out point
Initiation of payment: indicates the initiation of payment part when technical issues may occur
Analysis of milestones for online services
Interaction with the demo version: shows the user's initial encounter with the service
Start of registration: indicates the user's interest in the service
Completion of registration: confirms the user's interest in the service
Tariff selection: indicates the user's intention to use the online service Frequent drop-off point
Start of payment: indicates the start of the payment part when technical problems may occur
Analysis of milestones for an offline service
Service information display: shows the initial encounter of the user with the service
Download of materials: indicates the user's expressed interest in the service
Viewing the form: indicates the user's intention to use the service
Initiation of form completion: confirms the user's intention to frequent the drop-off point
Submitting the form: confirms the submission of the form part when technical problems may occur
Now that we know what we want to measure, it's time to set it up on our website. Since we want to set up exactly what to measure on our site ourselves, we'll use Google Tag Manager (GTM), which gives us a wide range of options when it comes to measurement.
Installing the GTM code on the site
1) Create a Google Tag Manager account
Go to the Google Tag Manager site, click on the "Create Account" button and follow the instructions.
2) Create a new container
Click on the "Create Container" button. Enter a name and select a country or region.
Click on the "Create" button.
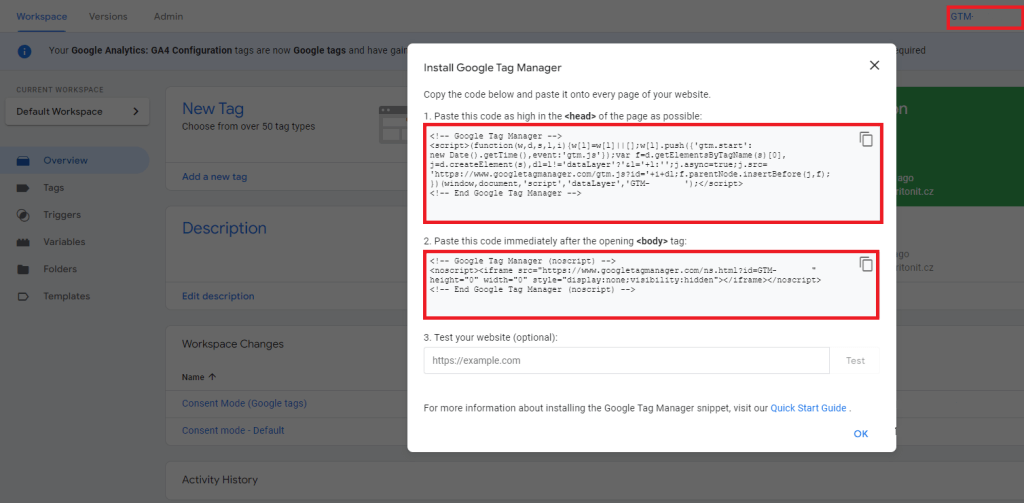
3) Get the GTM code
Click on the container ID in the upper right corner. (See image)
Copy the GTM code that is shown in the fields.
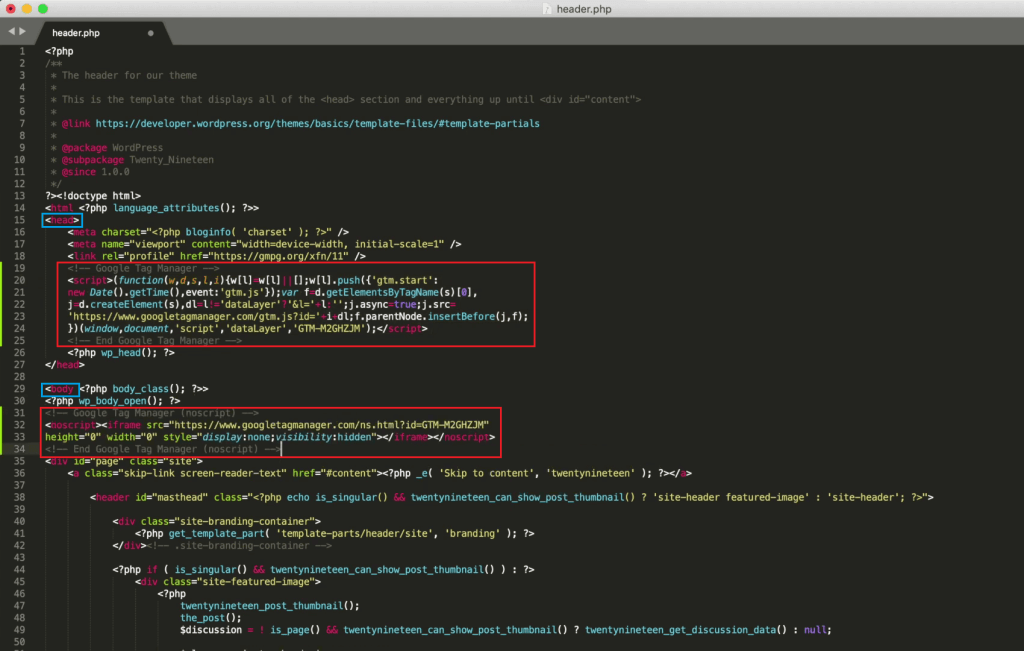
4) Adding the GTM code to your website
Open the HTML source code of your website.
Paste the first part of the GTM code below and the second part of the code below
5) Save the changes in the source code and publish the updated version of your site.
Where to get the GTM code?
Click on the container ID. This will expand two fields with the GTM code, which you then paste into your site.
Where to insert the GTM code?
Paste the GTM code into the HTML source code of your page. Place the first part of the code under the tag and the second part of the code under the tag.
Configuring GTM tags
In GTM, you can further configure tags that measure user activities on the site that are relevant to your predefined goal and link them to GA4 (Google Analytics 4).
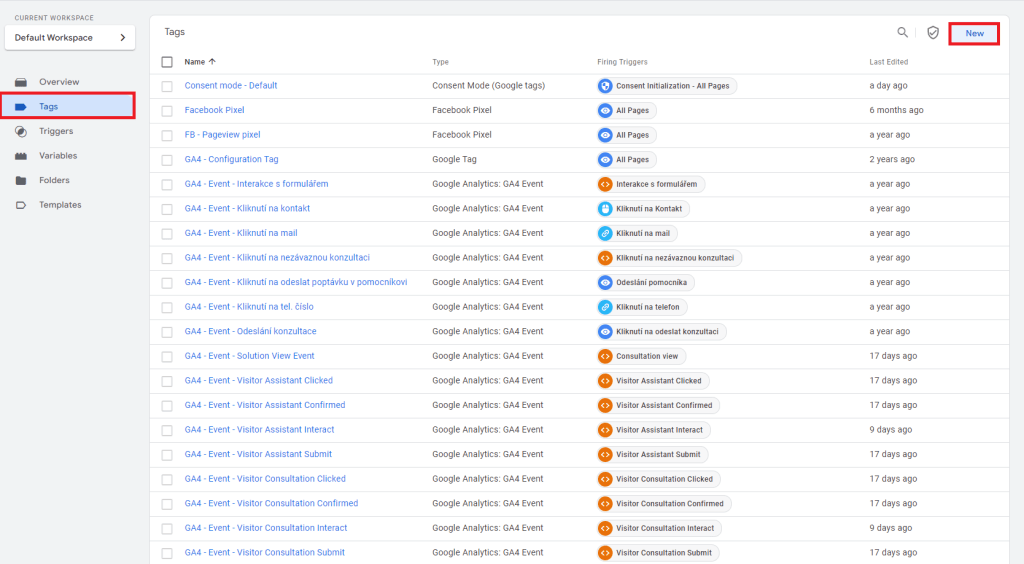
1.Create a new tag
Select "Tags" in the menu and then click "New"
2.Configure the tag (Tag)
Fill in account identifiers, tracking codes or custom script code. Set additional options such as events or targets.
3. Trigger Settings
Add a trigger that determines when the tag should be activated.
4. Save and publish
When finished, click "Save". Then click "Submit" to make changes to the container and make the tag active.
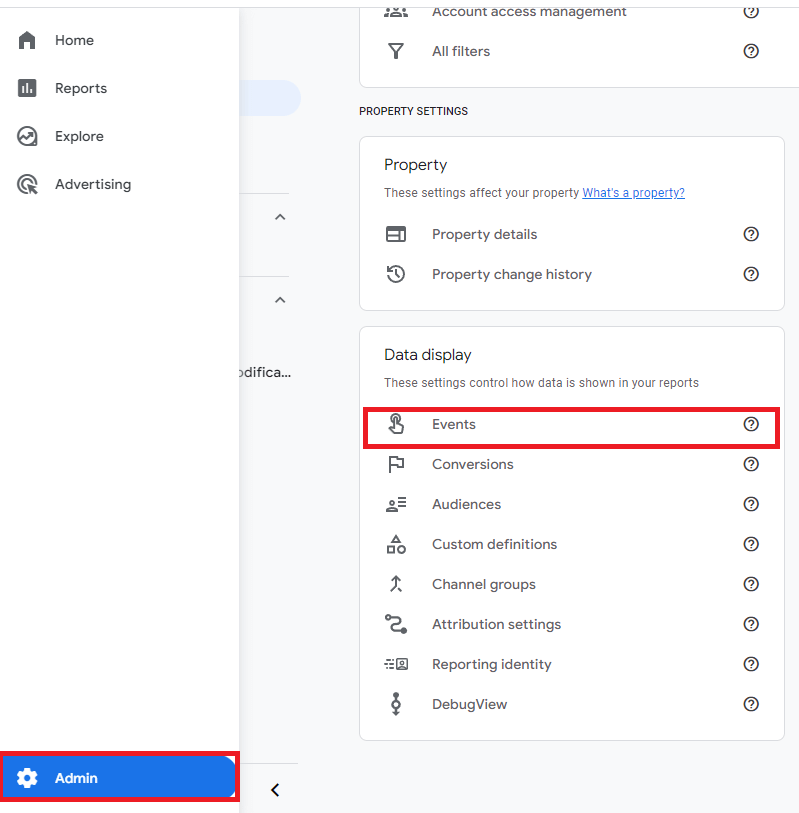
Google Analytics Events
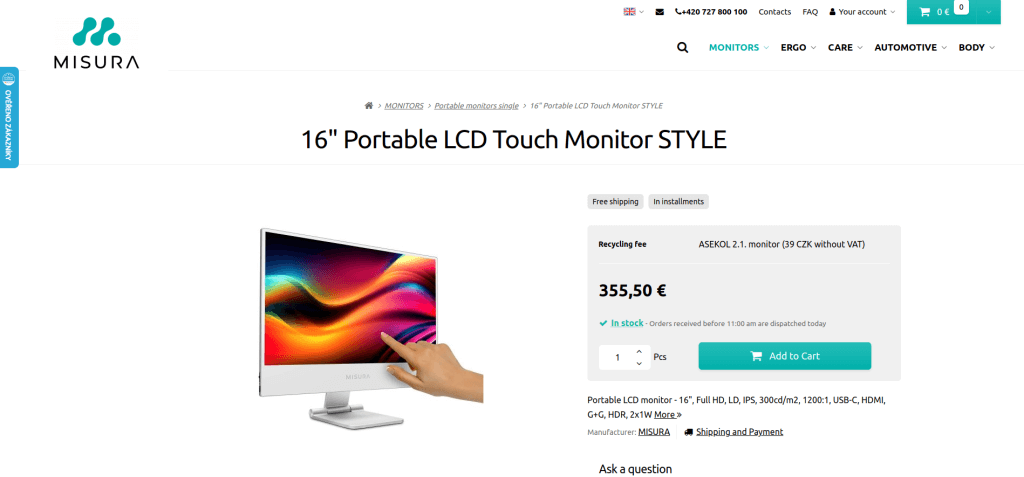
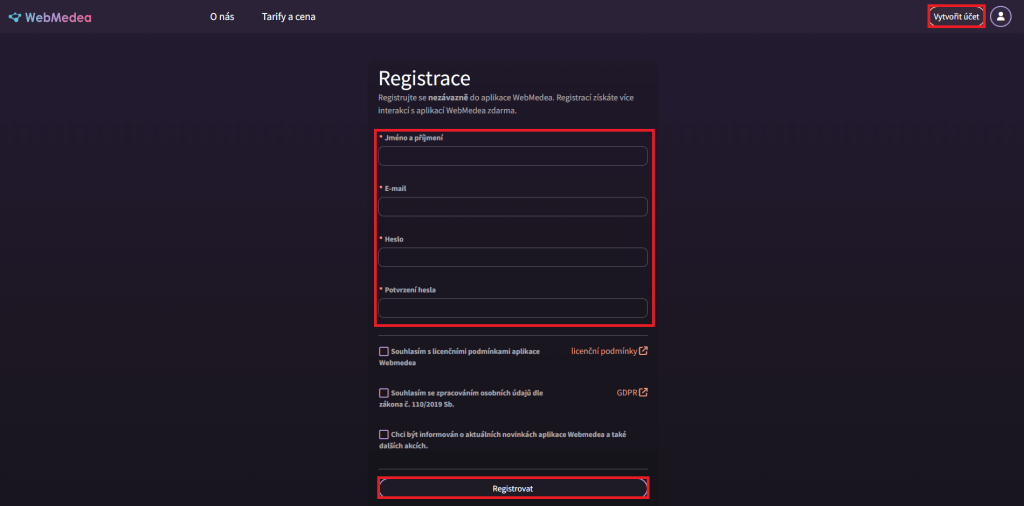
For companies that offer online services, it is important to measure visitor activity on the site. For our client WebMedea, which offers a software service, it is important to know how visitors and users interact with the site and in which part of the site they most often encounter a problem. That's why we configured end-to-end tracking of registration, account logins, and plan payments.
For example, events such as:
- user_register_view
- user_register_interact
- user_register_submit
measure the account registration process from the first view of the form, through the interaction with the form, to the submission. These events can then be marked as conversion events and imported into Google Ads for further marketing enhancements.
How to choose a naming convention: user_register_view
- Part 1 - indicates WHO performed the event
- Part 2 - indicates WHAT was the action the visitor took
- Part 3 - specifies the stage of the action performed
Example of the chosen naming convention for the online service
| part 1 notation | what the notation specifies |
|---|---|
| user | an unregistered visitor to the site |
| account | a site visitor logged into an account |
| part 2 notation | what the notation indicates |
|---|---|
| create | indicates the creation of a new account |
| edit | indicates editing an existing account |
| register | indicates the registration of a new account |
| verify | indicates the verification of a new account |
| payment | indicates the payment for the tariff |
| part 3 notation | what the notation indicates |
|---|---|
| view | indicates the view of the form |
| interact | indicates the start of the interaction with the form |
| submit | indicates the confirmation and submission of the form |
Conversion event label
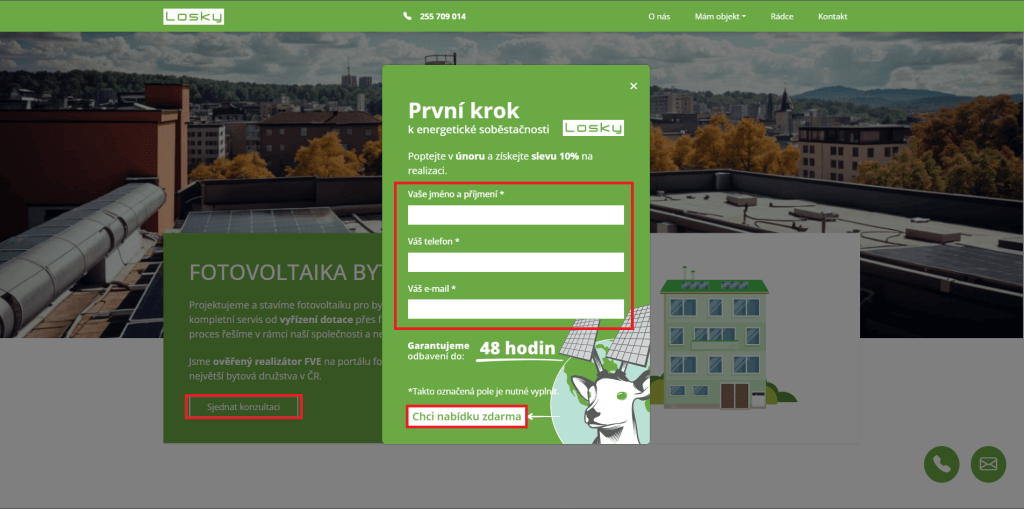
For our client Losky, offering telecommunications and photovoltaic services, it is crucial to gather information about visitor activity on each offer page and identify the areas where they most often encounter problems. Therefore, we set up a complete measurement of consultation requests, requests for assistance and bid selection.
For offline services, the naming convention will differ from online services. This is because it is a different platform where different soft and hard targets are set.
For offline services, the primary concern is to get as much information about the leadoff as possible, since the payment will take place outside the system. For an online service, all the process is important, including payment, which happens directly on the site.
Example of the chosen goal naming convention for an offline service
| part 1 notation | what the notation indicates |
|---|---|
| visitor | indicates that the action was performed by a visitor to the site |
| part 2 notation | what the notation indicates |
|---|---|
| consultation | indicates that the subject is a consultation request form |
| assistant | indicates that the subject is an assistant request form |
| indicates that the subject is a button to send an email | |
| phone | indicates that the subject is a button to start a phone call |
| notation of part 3 | what the notation indicates |
|---|---|
| click | indicates that the action was: clicking the form/phone button |
| interact | indicates that the action was: the beginning of an interaction with a form |
| submit | indicates that the action was: clicking to submit the form |
| confirmed | indicates that the form submission was successful |
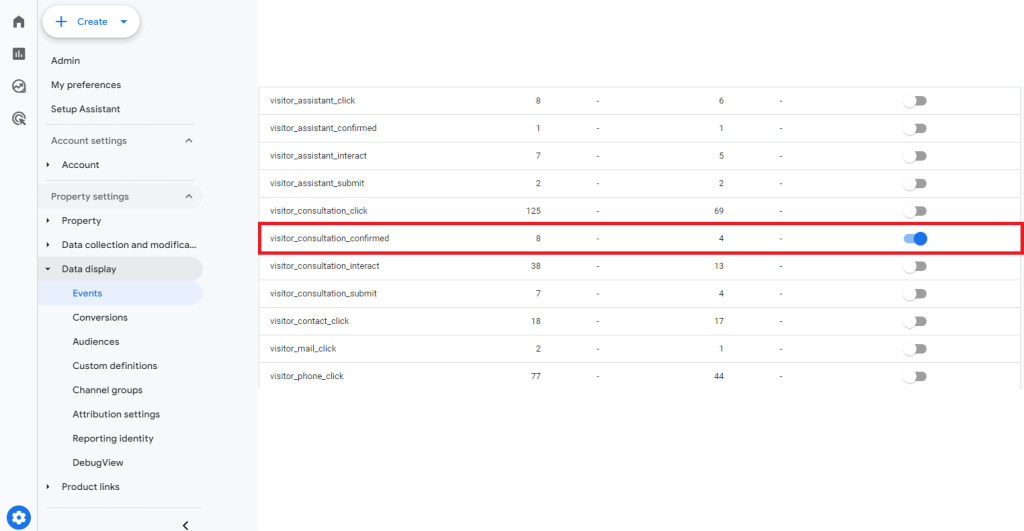
In this case, we set the conversion goal to submitting the form to the consultation request. Therefore, we marked as "conversion" an event named "visitor_consultation_confirmed", which indicates the successful submission of the form.
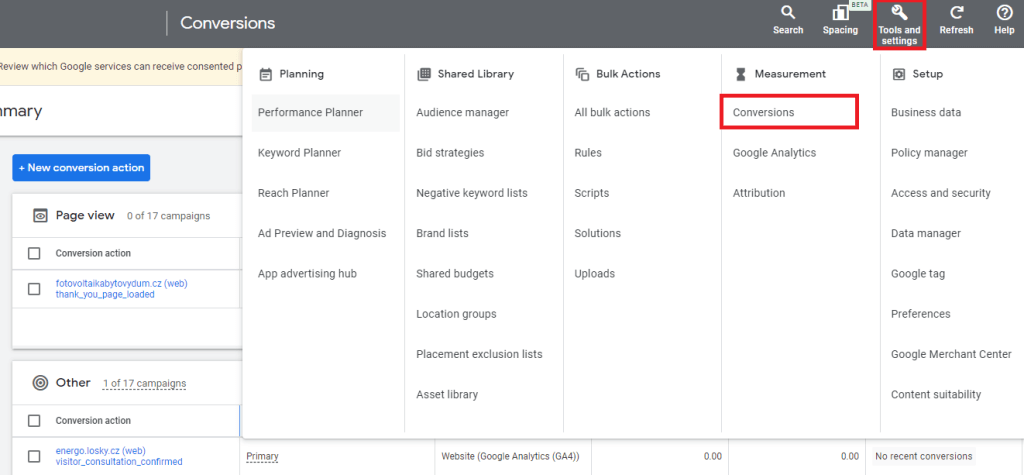
Importing a conversion event into Google Ads
In order to set conversion events as a goal in your campaigns, you need to import them into Google Ads using a few simple steps.
1. In Google Ads, in the "tools and settings" menu, in the "Conversions" section, create a new conversion.
2. Select "Import > Google Analytics 4 properties > Web" from the menu.
3. Select the event that we have marked as "conversion" in GA4.
4. Once you have made your selection, click "Save and Continue".
You can now set the conversion event imported in this way as a goal in your campaigns.
Measurement outside your own website
Google Analytics 4 can't always correctly classify the source of visits, so it's a good idea to use UTM parameters to measure the origin of visitors from both online and offline sources. These parameters are used when measuring on social media, tracking referral links from online media, partner collaborations and QR codes in offline materials such as product catalogues, magazines or billboards.
UTM Parameters
UTM parameters are text strings that are added to the end of a URL to track traffic sources from platforms other than your website. This provides valuable information about the success of your campaigns, specific segments and specific keywords.
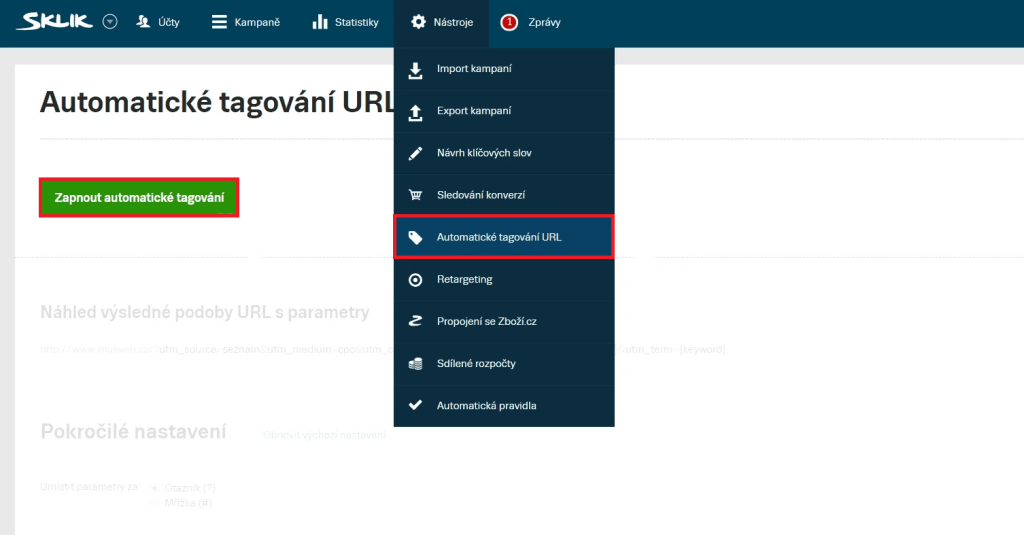
UTM parameters in Sklik
On the Sklik platform, it is necessary to activate the "Automatic URL tagging" feature and adjust the values of utm_campaign, utm_content and utm_term. These settings will allow you to track traffic and campaign effectiveness in Sklik in detail.
UTM parameters on Facebook
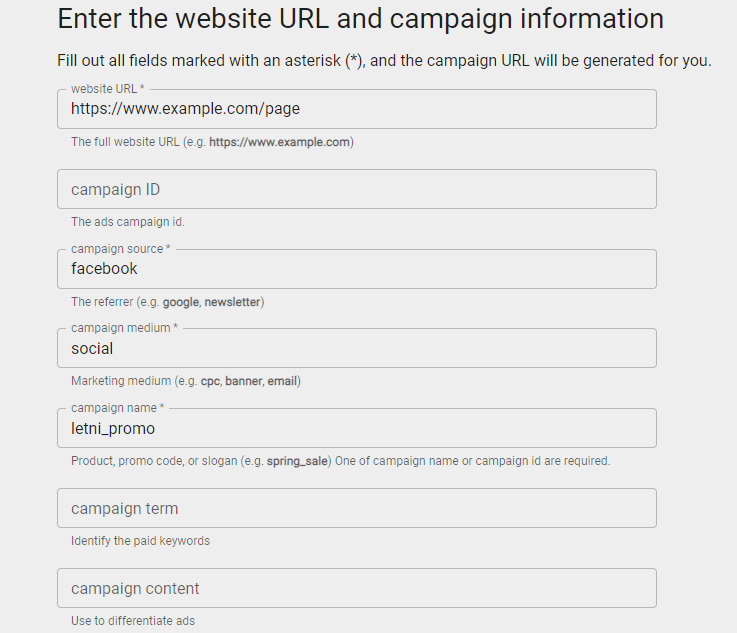
Facebook does not automatically add UTM parameters, so you need to assign them separately. Using the Campaign UTM Builder, you can easily generate URLs with assigned parameters to identify source, medium, campaign, keywords and content.
http://www.example.com/page?utm_source=facebook&utm_medium=social&utm_campaign=letni_promo
utm_source= Specifies the traffic source (e.g. facebook, mailchimp, list)
utm_medium= Specifies the medium through which the link was shared (e.g. social, cpc, ppd)
utm_campaign= Identifies the specific campaign associated with the link (e.g. summer promo)
utm_term= Identifies the keyword/term associated with the link (e.g. product discount)
utm_content= Describes the specific content that was clicked (e.g., call-to-action button)
Test conversion goals and UTM parameters before running campaigns. Click on your links and check that they are redirecting correctly.
If you want to measure traffic coming from organic posts, you'll put the UTM parameters back together in the Campaign UTM Builder. However, to keep the URL link from being too long, you can shorten it using tools like Bit.ly. You can then paste the shortened link into the post's text box and everything will work as it should.
Example evaluation
When evaluating campaigns in terms of conversion goals, we most often observe in which part of the site visitors left the most.
In the Elk example, we observe whether visitors left right after clicking on the form, which may indicate that the content on the impact pages is irrelevant to them. If it's while interacting with the form, it may indicate that the form is asking too much or too sensitive information from the visitor. Next, we also assess what percentage of visitors completed the conversion by submitting the form. We further supplement the data collected in this way with a comment: what might have caused the problem and what are the next steps to fix it.
Furthermore, thanks to the UTM parameters, we can find out from which Facebook campaign or post the most visitors clicked through to the website and what conversions they brought. Using this information, we can see how the materials used are performing and can adjust other campaigns accordingly.
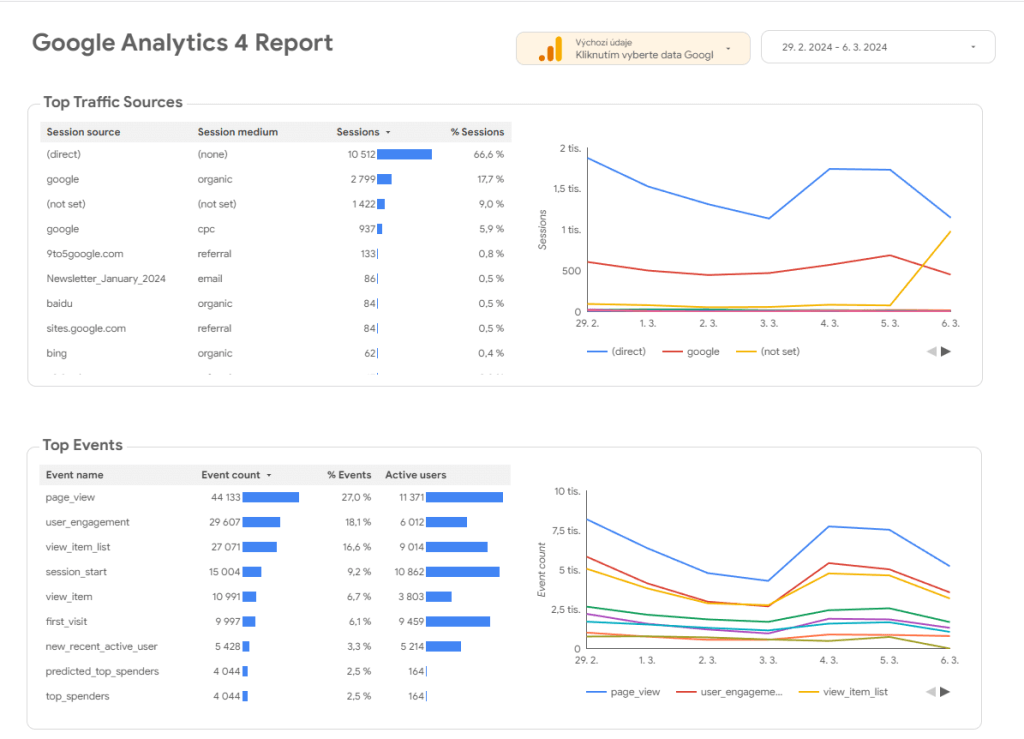
Looker Studio
After thoroughly evaluating the data from all sources, the next step is to present it. For this purpose, the Looker studio tool is the best tool to use to clearly compile reports and then share them.
The main advantage of this tool is that it can be linked to data sources such as Google Ads, Google Analytics, YouTube or Google Sheets, and these can be projected in the form of graphs and tables. These can be interacted with in real time and sorted by date, for example.
Here is an example of how such a report can look like:
Building audiences and retargeting
The data obtained from GA4 and UTM parameters can be used not only to measure conversions and visits to the site, but also to effectively build audiences with remarketing to them. Here are some options and steps on how to use this data:
1) Analyze conversion data
Analyze conversion measurement data to understand user behavior. Look for correlations between pages, products, and actions taken by users.
2) Define target audiences
Create audiences based on user behavior. For example, you can create audiences that visited certain product categories or completed conversion actions.
3) Retargeting based on pages
You can run a remarketing campaign on users who have visited the site but have not taken any action and have left. For example, users who viewed a product and information about it but decided not to buy the product.
4) Action-based retargeting
Create a remarketing campaign to users who took an action marked as a soft conversion, such as adding to cart or viewing cart contents, but did not proceed to complete the purchase.
5) Dynamic retargeting
Dynamic retargeting uses data to serve personalized ads that feature products that a user has recently viewed on your site. This type of remarketing will also be shown to the user on other sites, reminding them of the product they themselves have expressed interest in.
6) Creating a Look-alike audience
Use conversion data to create a look-alike audience. Look for patterns and similarities in the sample of users who brought conversions and use this data to build a look-alike audience and start remarketing to that audience.
Result
By setting up a complete quality measurement setup with integration of UTM parameters and Google Analytics events, we are able to run effective marketing for our clients.
Further, by breaking down soft and hard conversions across all platforms, we can identify what part of the site visitors are most likely to leave and address the root cause of the problem.
Based on all this data, we build detailed audiences and run remarketing campaigns to them. Last but not least, we incorporate the data obtained from the measurement into a clear form and present it to our clients through a report.
Do you want to create a functional turnkey measurement?
Related articles
At TRITON IT, we are a partner of the Právě teď association, with whom we collaborated this year on the ‘March for the Brain’ event. The event,...
COLORIT is one of the long-established players on the Czech B2B and B2C market for paints, varnishes and sealants. Its position has not been...
Saleor is an open platform written in Python that provides a complete backend for creating an e-shop and implements all essential processes,...